Zombies Aren't Real Wiki › San Francisco
Zombies Aren't Real San Francisco guide
The hard part of the five Zombies Aren't Real San Francisco levels was finding a short wall near enough to water for ships to cover it. We cleared level three on the west coast and level four by rebuilding at the northeast docks. Hotter Fire is San Francisco's home perk in Jogamedev's horde-defense strategy game.
Zombies Aren't Real San Francisco levels and unlocks
The Civilians column is the map-set population. A level's battle total can differ, so each saved count comes from the end screen of our successful Normal attempt.
| Level | Civilians | Saved in San Francisco | Card on our save |
|---|---|---|---|
| Level 1 | 6,188 | 99316% Silver | Cluster Bomb |
| Level 2 | 19,600 | 1,6378% Bronze | AC-130 |
| Level 3 | 71,861 | 3,6645% Bronze | Security Bus |
| Level 4 | 161,782 | 9,7946% Bronze | Oil Slick |
| Level 5 | 213,952 | 13,7586% Bronze | Railgun |
| City perk on clear | Hotter Fire | ||
San Francisco level 1: Start between the lake and the curved residential streets
- Badge
- Silver · 16%
- Civilians saved
- 993 / 6,188
- Game time
- 4:11
- Top kills
- Battleship 4,442 · Mortar 1,287
In San Francisco level 1 we enclosed the streets southeast of the lake, where the residential roads bend around a cluster of taller buildings. We kept the boundary small and left it without a gate. The plan put 14% of the civilians inside before the outbreak. A battleship fitted in the deep water to the west and four mortars reached out from the zone.
We saw the first green crowds to the north and east. They were within reach as soon as they approached the lakeshore and the junctions. The ship did most of the work. Three Cruise Missile shots added 66 kills.
San Francisco level 2: Extend east from the lake and keep a ship to the north
- Badge
- Bronze · 8%
- Civilians saved
- 1,637 / 19,600
- Game time
- 6:25
- Top kills
- Battleship 11,206 · Fire Mortar 7,168
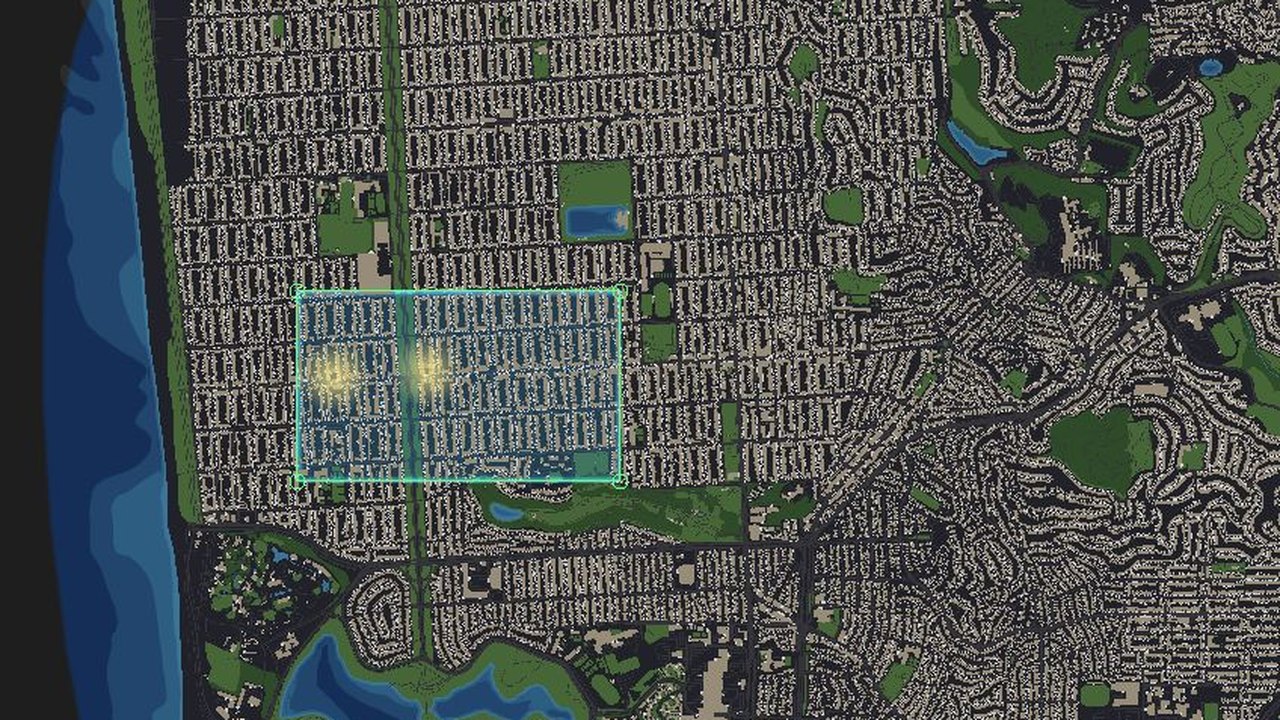
San Francisco level 2 adds straight residential streets beyond the curving hills and opens the Pacific shoreline. Our San Francisco level 1 district held just 4% after the map expanded. We brought the next row of houses inside a shared eastern wall, set a Contractor to Repair and placed a gate on the new east side. The planning estimate doubled to 8%.
We kept a ship by the original district and used the northern lake for the next one. Fire Mortars ran across the northern part of the old zone into the new blocks. Fire spread through the streets beyond the north wall. Our San Francisco level 2 Cluster Bomb caught 13 zombies on the eastern approach. Most had already moved north.
San Francisco level 3: Shorten the west-coast perimeter on a retry
- Badge
- Bronze · 5%
- Civilians saved
- 3,664 / 71,861
- Game time
- 7:56
- Top kills
- Battleship 41,608 · Helicopter 21,805
Our first two San Francisco level 3 layouts stretched east from the old district. Corners broke and the eastern mortars ran dry. The second San Francisco retry unlocked Spike Strip. Our first move to the west coast still left a long eastern wall. It started with 9% sheltered and finished with just 125 survivors. The Repair building in the northeast was a long way from the first break in the middle of that wall.
For our fourth attempt we rebuilt inside the same coastal neighborhood. We accepted 5% in planning, upgraded all four walls, then bought close-range garrisons for the streets beside them. We spread three ships between the coast, the southern inlet and the small northeastern pool. The northeast wall eventually broke, but the smaller district kept enough people alive to clear San Francisco level 3.
San Francisco level 4: Rebuild at the northeast docks
- Badge
- Bronze · 6%
- Civilians saved
- 9,794 / 161,782
- Game time
- 13:20
- Top kills
- Howitzer 74,453 · Helicopter 52,422
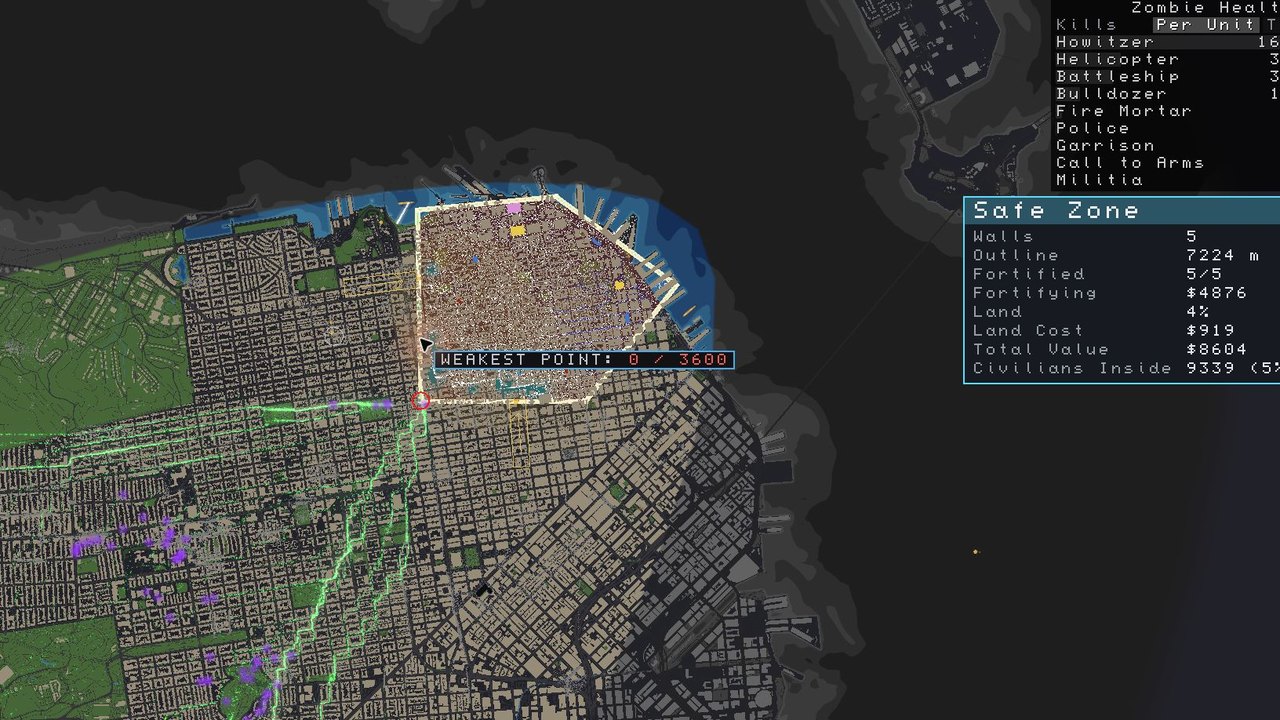
The western defense that cleared San Francisco level 3 struggled against a much bigger northern crowd on the next map. Our first extension started breaking on the northwest corner. A retry with the new Howitzer and turrets lost the east wall. On our third San Francisco layout the horde was inside before the helicopters arrived. Restarting that attempt unlocked Bulldozer.
On the successful San Francisco level 4 attempt we used a five-sided zone at the northeast docks. Two short sides faced the water, with ships to the north and northeast. We put garrisons on the west and south approaches and backed them with Howitzers and Fire Mortars. When the southwest corner finally broke, the Radio Station's Militia began firing. Enough civilians remained in the dock district for Bronze.
San Francisco level 5: Keep the dock district behind a shared wall
- Badge
- Bronze · 6%
- Civilians saved
- 13,758 / 213,952
- Game time
- 15:35
- Top kills
- Howitzer 104,232 · Helicopter 54,043
San Francisco level 5 opens the southern hills and the rest of the eastern piers. We kept the dock wall and added a southern district beside it. A Coffee Shop and a Restaurant supplied Repair. Another Howitzer and more Fire Mortars joined the old battery. We added gates and corridors on the new west and south approaches.
The southeast corner of the new district broke first. Late in the battle the old neighborhood still had a wall segment at 3,308 of 3,600 HP. We held our last helicopter calls for the southwest stream of purple mutants, the old corner and the streets inside the breach. That corner broke late as well, and the San Francisco dock crowd still finished above the 4% Bronze line.
What changed after the San Francisco retries
On San Francisco level 3 our long east wall broke beyond the reach of Repair. Shrinking the coastal zone from 9% to 5% in planning let us upgrade all four walls and put garrisons beside them. On level 4 the western site and the northeast docks both enclosed 5%. At the docks two short sides faced the sea. We placed the gates and close-range garrisons on the west and south streets where the horde approached.
San Francisco perk: Hotter Fire
Hotter Fire increases fire damage and makes fire spread faster across green space. San Francisco starts with that perk equipped. Clearing the dock defense on the fifth level gave us the unlock for other cities and the Railgun for later loadouts.
San Francisco campaign questions
- Did enclosing more civilians help on the San Francisco coast?
- Not by itself. Our wider coastal plan started at 9% sheltered and ended with 125 people alive. The fourth layout, drawn inside the same neighborhood with shorter, upgraded walls, saved 3,664. The ships and close-range garrisons changed too.
- Did more helicopter calls save the long eastern San Francisco wall?
- No. On our second try at San Francisco level 3, seven helicopters recorded 32,079 kills. The southern end of the extension still broke and only 822 civilians survived. Our next San Francisco attempt moved to the coast.
- Can I clear San Francisco level 4 after the dock wall breaks?
- Yes. Our San Francisco level 4 district turned red at the southwest corner, and the end screen still credited 9,794 saved, enough for Bronze, with 680 militia armed.
Comments
Site
No comments yet. Ask a question or share what worked in your runs.