Zombies Aren't Real Wiki › Units
Zombies Aren't Real units
Zombies Aren't Real units are the guns, artillery and traps you buy with money before the outbreak in Jogamedev's horde-defense game, plus 19 battle cards you buy with skill points (SP) and call in once the horde is loose. Compare prices and combat stats on the cards, and press a level on a card's ladder to see how its stats change.
- Units listed
- 16
- Battle cards
- 19
- Build tools
- 5
The price strip shows the first placement before discounts. Each step on a building unit's ladder lists the cost of that upgrade at the base price. For examples from battle, see which units carried our campaign runs.
Guns
Building size sets a garrison's reach. Roof height matters for a sniper, and a clear street matters for a railgun.
Garrison
Level 1/4
$15–$225
Formula floor and cap; $18–$270 outside. Quotes are rounded and depend on the building. The build bar shows the range for the current map, such as $18–$270 in Boston stage 1.
Use the square root of the building's footprint in square meters as its width. Each meter adds $2.25 to a $15 base price and 2.625 m to a 30 m base reach. The price caps at $225 before the zone adjustment.
- Damage
- 5
- Fire rate
- 20/s
- Rangemaximum
- 262.5 m
- Magazine
- 180
- Reload
- 6 s
- Reloads outside
- 10
Sniper
Level 1/4
$50
$60 outside.
Aim the 30° cone across an approach. Each meter of roof height, up to 450 m, adds 4.7 m of reach and 1 m to the blind spot. Higher levels multiply the outer reach including the roof bonus.
- Damage
- 80
- Fire rate
- 2.5/s
- Rangebefore roof bonus
- 50–400 m
- Magazine
- 20
- Reload
- 5 s
- Reloads outside
- 10
Turret
Level 1/4
$90
$108 outside.
Cover a short approach from any building. The turret fires until its single magazine runs dry, even inside a staffed safe zone.
- Damage
- 4
- Fire rate
- 100/s
- Range
- 75 m
- Magazine
- 1000
- Reloads
- 0
Railgun
Level 1/4
$100
$120 outside.
Aim along an open street. The 10° cone sets where the gun can acquire a target. A round continues through zombies beyond that target until a building or the map edge stops it.
- Damage
- 10
- Fire rate
- 1/s
- Range
- 420 m
- Magazine
- 1
- Reload
- 12 s
- Reloads
- 10
Artillery
Check the inner range before choosing a position. Packs that get closer than that pass under the guns.
Mortar
Level 1/4
$75
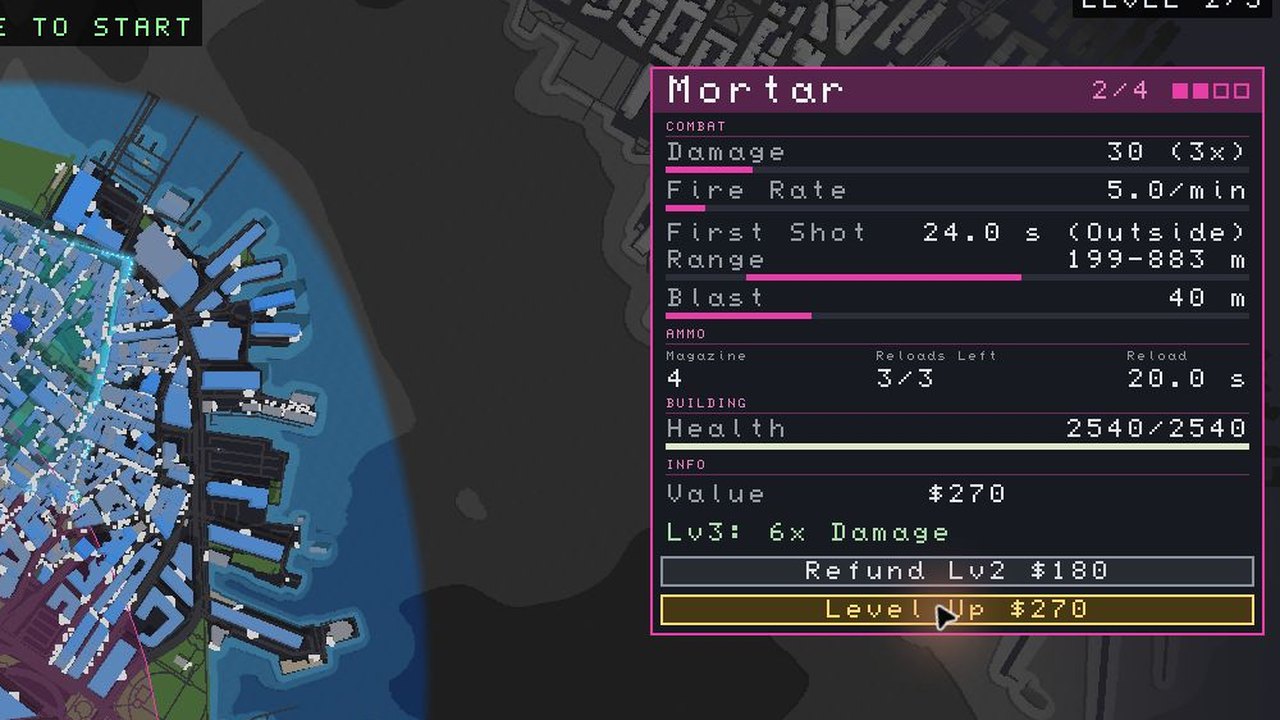
$90 outside. Each Mortar already placed adds $1 to the next.
The crew aims at clusters and leads moving packs. Each meter of roof height adds 2 m of outer reach, up to 150 m of roof height. Gas Mortar, Fire Mortar and MLRS share that roof bonus.
- Damage
- 10
- Fire rate
- 5/min
- Rangebefore roof bonus
- 160–600 m
- Blast radius
- 40 m
- Magazine
- 4
- Reload
- 20 s
- Reloads outside
- 3
Fire Mortar
Level 1/4
$120
$144 outside.
The shell leaves a burning patch. It can ignite adjoining greenspace and burn your officers.
- Fire rate
- 5/min
- Rangebefore roof bonus
- 160–600 m
- Fire radius
- 20 m
- Burn time
- 8 s
- Magazine
- 4
- Reload
- 20 s
- Reloads outside
- 3
Gas Mortar
Level 1/4
$90
$108 outside.
A shell stops zombies from moving or biting while the cloud lasts. Civilians and officers caught in it also stop.
- Fire rate
- 5/min
- Rangebefore roof bonus
- 160–600 m
- Gas radius
- 50 m
- Stun duration
- 6 s
- Magazine
- 4
- Reload
- 20 s
- Reloads outside
- 3
MLRS
Level 1/4
$200
$240 outside.
Rockets spread across a pack in a single volley. Cover the launcher during its long reload.
- Damage
- 10
- Fire rate
- 4/s
- Rangebefore roof bonus
- 200–900 m
- Blast radius
- 22 m
- Rocket scatter
- 18 m
- Magazine
- 12
- Reload
- 60 s
- Reloads outside
- 2
Howitzer
Level 1/4
$400
$480 outside. Each Howitzer already placed adds $200 to the next.
Place it far enough back to clear its blind spot. A taller roof adds no reach. Its shells can bring down buildings.
- Damage
- 50
- Fire rate
- 4/min
- Range
- 500–6,500 m
- Blast radius
- 140 m
- Shell flight
- 4 s
- Magazine
- 2
- Reload
- 30 s
- Reloads outside
- 3
Battleship
$750
Each ship adds $550 to the next. The price is the same outside a zone.
Moor the 150 × 18 m hull in open water. Its guns cover 200–1,400 m from midship. Each gun can fire every 0.5 s. A shell deals 10 damage in a 50 m radius. The ship reloads for 10 s after 12 shells and has unlimited reloads. Put it in a planning slot and press that slot's key.
Traps and explosives
Ground traps cost the same inside and outside a safe zone. Painting another cell or placing another trap keeps the same price.
Mine Field
$15
A zombie within 3 m starts a 3 s fuse. The blast deals 40 damage to zombies within 65 m and can hit your own units.
Spike Strip
$1 per cell
Paint a strip across the street. Each cell covers 4 × 4 m and slows zombies to 40% of their usual walking speed. Civilians and officers keep their pace.
C4
$500
Use Detonate during the outbreak to trigger a charge. The blast reaches 160 m, deals 200 damage to zombies and can destroy buildings, walls and friendly units.
Chemical Mine
$10
A zombie within 3 m starts a 3 s fuse. The mine then stuns everyone within 45 m for 8 s, including friendly officers. The build bar shortens it to Chem Mine.
Oil Slick
$1 per cell
Each oil slick cell covers 4 × 4 m. Fire or a blast ignites it. Flames travel across connected oil at 100 m/s, and each burning cell lasts 12 s. The build bar shortens it to Oil.
Napalm Drum
$100
Use Detonate to light a napalm drum. The ground burns within 40 m for 20 s, endangering civilians and igniting oil in the patch. The build bar shortens it to Napalm.
Battle cards
Ready is the wait from the start of the outbreak until you can first use the card. The Quick Deploy perk cuts each first-use wait by 33%. Arrival time starts when you give the order.
Paratroopers
1Mark open ground for the drop. In our Miami 2 run, the Guard officer stayed by the north gate while the Pursue officer left his landing spot to hunt along the road.
- 5 damage per shot
- 120 m gun range
- Ready at outbreak
- 8 s to arrive
20 officers
Airstrike
2Drag a line across a pack to set the bombing run. Buildings caught under a bomb can collapse.
- 6 bombs
- 200 damage per bomb
- 140 m blast radius
- Ready at 45 s
- 15 s to arrive
1 use
Helicopter
2Mark a hunting area. When its last magazine runs dry the gunship flies off the map to rearm, then returns; in our Boston 4 run that is how it left the west bridge.
- 560 m hunting radius
- 50 shots/s
- 10 damage per shot
- 30 s to rearm
- Ready at 30 s
- 10 s to arrive
1 use
Gas Bomb
1Use the cloud to stop bites while your other units fire. Officers inside the gas also stop shooting. Our Miami 1 results screen listed this card as Stun Gas.
- 350 m cloud radius
- 60 s stun zone
- Ready at 30 s
- 10 s to arrive
1 use
Fire Bomb
1Drag the flight path over the horde. Burning patches can spread across greenspace and catch civilians.
- 30 bombs
- 48 m fire radius per bomb
- 40 s burn
- Ready at 30 s
- 12 s to arrive
1 use
Call to Arms
1Drag a circle over civilians and release to enlist a share of the crowd as officers.
- 5% of civilians recruited
- 150 m maximum radius
- Ready at outbreak
- Immediate effect
1 use
APC
3Drop it on a street. Its four guns can track different targets. In our Detroit 5 run the unit drove back to the safe zone when it ran out of ammo, rearmed and went out hunting again on its own.
- 160 m gun range
- 10 damage per hit
- 45 m/s top speed
- Ready at 15 s
- 10 s to arrive
1 use
Controlled Demolition
1Drag from a highlighted tower toward the street where you want it to fall.
- 60 m minimum building height
- Ready at 20 s
- Immediate effect
3 uses
Rally
2Center the circle on your guns. It speeds up shots between reloads for as long as the guns stay inside.
- 50% faster fire
- 200 m radius
- 10 s duration
- Ready at 20 s
- Immediate effect
1 use
Seek & Destroy
2Select a garrison to send its crew into the streets. The building stops firing as soon as the officers leave.
- 10 / 30 / 60 / 120 officers at garrison levels 1–4
- Ready at 10 s
- Immediate effect
1 use
Security Bus
3The bus collects unbitten civilians by road and drives them to an intact safe zone. It can drive off the map to save its passengers if it cannot reach shelter.
- 400 seats
- 15 m pickup radius
- 60 m/s top speed
- Ready at 5 s
- 5 s to arrive
1 use
Cruise Missile
2Click the impact point. The missile can level buildings and breach walls within the blast.
- 100 damage
- 56 m blast radius
- Ready at 30 s
- 2.5 s from order to impact
3 uses
Medivac
3Mark the first pickup and the helicopter flies the rescue trips itself. In our Capitol Hill 1 run, MEDIVAC INBOUND confirmed the order. The message gave no passenger count. Patch notes spell the card Medevac.
- 200 seats
- 60 m pickup radius
- 180 m/s top speed
- Ready at 5 s
- 5 s to arrive
1 use
Bulldozer
3Set its route through the horde. It crushes zombies in its path and seeks another pack when it reaches the end.
- 5 m crush radius
- 30 m/s top speed
- 400 m² maximum building footprint (bounding box)
- Ready at 20 s
- 10 s to arrive
1 use
Cluster Bomb
2Sweep a strip with small blasts. Buildings stay standing, but the bombs can hit civilians, walls and bridges.
- 72 bombs
- 40 damage per bomb
- 22 m blast radius
- Ready at 45 s
- 12 s to arrive
1 use
Tank
4The tank hunts packs within shell range. In our Detroit 4 run we selected the unit as it fired its last round. Its status changed to Out of Ammo, Leaving and it drove away.
- 30–220 m gun range
- 60 damage
- 30 m blast radius
- 12 shells per magazine
- Ready at 30 s
- 10 s to arrive
1 use
AC-130
3Drag the flight path. Each missile looks for a crowd near its assigned spot along the line.
- 30 missiles
- 150 m target search radius
- 60 damage per missile
- 35 m blast radius
- Ready at 45 s
- 8 s to arrive
1 use
The Cure
5Drop the cloud into a dense pack. Affected zombies can pass the cure to others before they die.
- 20 m cloud radius
- 10 s cloud duration
- 5 m spread distance
- Ready at 45 s
- 12 s to arrive
1 use
Nuke
15Mark the center of the shockwave. It kills civilians and friendly units in its path. Building damage falls with distance.
- 1,980 m radius
- 40,000 building damage at center
- 800 at edge
- Ready at 90 s
- 45 s from order to impact
1 use
Build tools
Bought with money from the build bar.
[B] Safe Zone
$100 + outline + land
Each 2 m of outline costs $0.75. The land charge is $0.50 times the square root of the safe area's land in square meters. Where to draw a safe zone
[Z] Wall
$25 + length
Add $0.75 for every 2 m of standalone wall.
[G] Gate
$50
Place a gate in a wall so civilians can enter the zone. Where gates fit
[Q] Evac Corridor
$30 + area
Add $7 per hectare of corridor. Both length and width count toward the bill. How evac corridors work
[E] Hold
$3.20 per m of radius
The price depends on how far you drag from the center to the edge. Hold and Broadcast
How Zombies Aren't Real units are priced and upgraded
- Outside a zone
- A building unit costs 20% more when its building center falls outside every safe zone. Traps and ships keep their listed price. Building guns and battleships outside a populated zone wait an extra 12 seconds to open fire.
- Reloads
- Fire rates on the unit cards are measured between reloads. Garrisons, snipers and mortar crews in a safe zone with civilians never run out of reloads; outside a populated zone they use the reload allowance on their unit cards. In one of our runs a breach cut a mortar to that allowance: see what happens when a safe zone is breached. A plain turret gets one magazine for the whole battle.
- More of one
- Mortar, Howitzer and Battleship increase in price with each copy on the board. All other placements keep their base rate. For a garrison, building size can still change the quote.
- Level up
- During planning, select the unit and click Level Up in its panel. To upgrade one unit with F, activate Upgrade Unit, choose Click mode and click the unit. In Paint mode, one click upgrades every eligible unit inside the cursor circle. Each garrison upgrade costs half the price of staffing that building. Other building guns charge 2, 3 and 6 times their base placement price for the three upgrades, with the zone price adjustment.
- Refund
- During planning, select a unit and press X to refund it. To refund several units together, select them and click Refund All in the selection panel. The build bar also has a Refund All button. Its confirmation asks whether to remove every placement on the level, including your walls and zones. Moving a zone boundary across a building also adjusts what you paid for its unit.
- Skill points
- In the loadout, each battle card costs the listed SP for every level. Multiply its level-one uses or officer count by the level bought. Charges last one battle under the standard rules. The Recharging Arsenal mutator changes how charges return.
- Friendly fire
- Automatic mortar and battleship shells spare civilians and walls, as do mine blasts and burning oil. A C4 charge can kill civilians and breach a wall. A napalm drum burns civilians but leaves the wall standing.
What does the next unit upgrade cost?
Read the Level Up button for the next purchase. Value shows what the unit is worth at its current level. In our Boston runs, two garrisons on different buildings quoted different prices, but each kept the same quote through level 4.
| Unit and placement | Level 2 | Level 3 | Level 4 |
|---|---|---|---|
| $37 Garrison | $19 | $19 | $19 |
| $91 Garrison | $46 | $46 | $46 |
| $90 Mortar outside the zone | $180 | $270 | $540 |
| $50 Sniper inside | $100 | $150 | $300 |
| $90 Turret inside | $180 | $270 | $540 |
The mortar and turret cost us the same to upgrade. The mortar gained damage per shell. The turret gained rounds in its magazine and still had zero reloads at level 4. Our sniper gained range at the far end of its cone, while its near limit stayed at 212 m.
Which units carried our campaign runs?
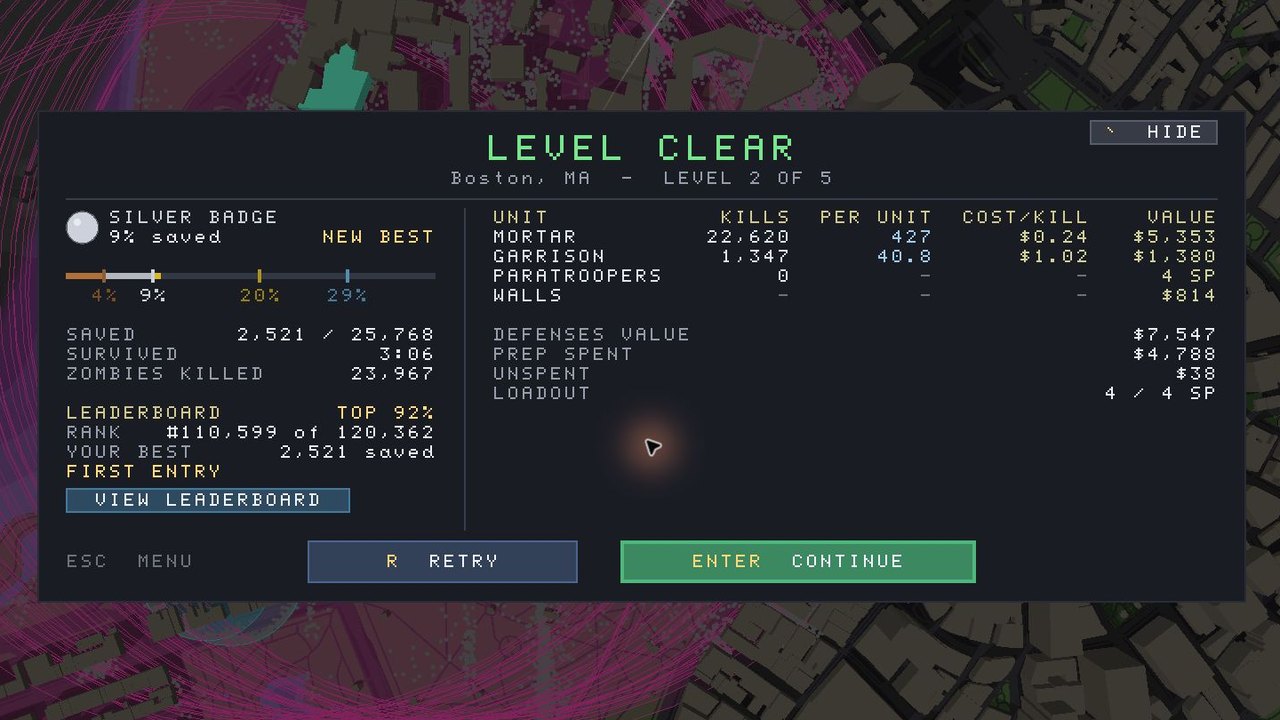
Garrison led our first Boston run, Mortar the next. On the results screen, Kills adds up every unit of the same type. Divide that row by Zombies Killed to get its share for the stage. Use Per Unit to see what a single placement averaged.
Early units in Boston
In our Boston 1 run, we staffed the streets inside the zone and the southern approach. Garrison accounted for 99% of kills. On our Boston 2 retry, we kept Garrison units close to the walls to cover the mortars' blind spots. Two rows of mortars could then fire on groups farther out.
Units for waterfronts and larger stages
In our San Francisco 1 run, a single Battleship on the lake beside our zone accounted for 77% of kills. By San Francisco 5, our five Howitzers accounted for 52% of kills around the expanded city. In our Capitol Hill 1 run we lined the rooftops north and south of the government buildings with Fire Mortars. Fire Mortar led there with 44% of kills.
After a breach
In our Boston 3 run we gave a Library the Militia ability. When the wall broke, nearby civilians took up arms. Militia accounted for 31% of kills. Civilians who take up arms drop out of the tally of people saved. On our Boston 4 retry we kept helicopter support for two different approaches. We sent one Helicopter to the west bridge and another over the breached eastern zone. Together they took 18% of kills, and the original small zone held.
Questions about Zombies Aren't Real units
- When does Seek & Destroy give me more officers than Paratroopers?
- A level 2 garrison turns out 30 officers for a 2 SP call. The same 2 SP buys 40 Paratroopers. A level 3 garrison turns out 60, but you give up the guns in that building.
- Can I change where a sniper fires?
- During planning, select the sniper and Shift-right-click to turn its cone. It takes 7 seconds to re-aim. A taller roof extends its reach and leaves a wider blind spot at its feet.
- How does the police station count its officers?
- The station counts every officer it has sent since the outbreak started. Losing an officer does not free up a place. See safe zones and special building abilities for the Police ability.
Comments
Spotted a wrong number? Tell us in the comments.
Site
No comments yet. Ask a question or share what worked in your runs.